Tuesday, December 1, 2015

One Pot Wonderful


There is a great new trend happening in the culinary world that I am a big fan of. This new phenomena is called One Pot Cooking. The concept is that all the ingredients go into one pot or skillet and the entire meal is cooked in one container. No multiple pots and pans to shuffle around on the stove and less mess is best in my house! This recipe is fun for us to make with the Divas as we aren't dealing with a fry pan and they are comfortable cooking in a big pot with Mom's supervision. Our favourite recipe for Chili Mac and Cheese comes from www.damndelicous.net This is a great meal to make ahead and freeze or have ready to reheat for a quick dinner or a delicious, warm lunch in a thermos.
 Ingredients:

1 tablespoon olive oil
2 cloves garlic, minced
1 onion, diced
1 pound ground beef or turkey
4 cups chicken broth
1 (14.5-ounce) can diced tomatoes
3/4 cup canned white kidney beans, drained and rinsed
3/4 cup canned kidney beans, drained and rinsed
2 teaspoons chili powder
1 1/2 teaspoon cumin
Kosher salt and freshly ground black pepper, to taste
10 ounces uncooked elbows pasta
3/4 cup shredded cheddar cheese
2 tablespoons chopped fresh parsley leaves
In many of the one pot recipes you will see the term "Dutch Oven" used as the main cooking applicance. Below is a definition from Wikipedia to explain what this is. This is not necessary for making this chili or any of the other soups and your trusty  soup pan or stockpot will work just as well. I do NOT in my vast culinary collection own such a coveted pot yet but I MAY just have a coupon for Kitchen Stuff Plus hiding in my wallet.
(Please don't tell my husband.)

A Dutch oven is a thick-walled (usually cast iron but also ceramic and clay) cooking pot with a tight-fitting lid. Dutch ovens have been used as cooking vessels for hundreds of years. They are called casserole dishes in English speaking countries other than the United States ("casserole" means "pot" in French), and cocottes in French.
Heat olive oil in a large skillet or Dutch oven over medium high heat. Add garlic, onion and ground beef or turkey.
Cook the meat until browned about 3-5 minutes. Crumble the meat while cooking to break it up evenly and be sure to drain the excess fat. This usually means a treat on our dog's kibble so she is a big fan of chili night!
Stir in chicken broth, tomatoes, beans, chili powder and cumin; season with salt and pepper, to taste.


Despite the fact the Divas are great eaters, none of the ladies in this house like BIG chunks of tomatoes in our soups or stews. Aylmer sells petite diced tomatoes that are seasoned and perfect for adding to your recipes. There are a few varieties of flavours so pick up a few cans when you are next at the grocery store so you have them on hand to throw together a quick dinner. 
Bring to a simmer and stir in pasta. You can use shell pasta or macaroni but my favourite is the Ditali pasta as it doesn't expand too much and over power the chili. You will note the recipe calls for 10 ounces of pasta. This amount is adjustable depending on how much you would like your recipe to resemble a soup or a chili. We call this our Chili Stoup as it is thick and a combination of soup and stew depending on how much pasta you add.
Bring to a boil; cover, reduce heat and simmer until pasta is cooked through, about 13-15 minutes.
Remove from heat.

Top with cheese and cover until melted, about 2 minutes.
We like to top our "Stoup" with green onions, some shredded cheddar and sour cream. For Dad and I there must be a good shake of red chili flakes for some heat.

The preparation work in this recipe is minimal and at the end of cooking you will only have one pot (or a beautiful Dutch oven) to clean along with your ladle. Get some fresh dinner rolls or make some garlic bread and dig into this hearty and comforting soup!

Bon Appetit

Tuesday, October 27, 2015

BOOtiful Halloween Bark

A decadent treat that is fun and festive to make with the kids and to get you into the spirit of Halloween!

Despite the fact that our household will be teeming with candy this time next week, we wanted to make a special Halloween treat together. I am not a baker but the girls do love to make muffins, cookies and of course the occasional sweet treat. I saw a few photos of the Halloween Bark on Pinterest and with Dad away for the day it seemed like a fun activity to do with a Diva and get us into the spirit of Halloween. With only a few ingredients and a big imagination this was gooey, messy, tasty and fun!
Ingredients:

3-4 cups chocolate chips
Assorted candy

There is no limit on the variety of candy you can use in your bark. We hit the Bulk Barn and a few double
digits ($) later we came home with our loot. We chose semi sweet chocolate chips and we did a second batch using milk chocolate chips.I saw the candy eyes on a few recipes and these were a must have for our bark. The giggles of putting these into the melted chocolate were priceless and we have leftovers for the day I brave cupcakes! You can use broken candy bars, pretzels or anything that appeals to your sweet tooth. We chose Candy Corn, Chocolate Peanut Butter Minis, Jelly Beans and sprinkles for the Duncan Bark
 
The youngest Diva who was the star meatball maker in my last blog had a soccer game and homework today. That meant an opportunity for me to have some one on one with my eldest, otherwise known as Diva Senior. Her Nana bought her this apron last year for Christmas and she loves to put it on the help out in the kitchen.
All you need to make the bark is a cookie sheet and parchment paper which you can buy in individual sheets as shown above or in rolls. It really is a life saver when baking or cooking and means a lot less work when cleaning your baking trays after.
The first step is to melt the chocolate. You can use a double boiler or the microwave. I have yet to perfect melting chocolate in the microwave even though our model has a specific setting for softening chocolate and butter. I have wasted many a good chocolate trying to use this method and need to treat my chocolate in a more humane way.  We use our pot and steamer insert and place a glass bowl over top of simmering water.
 You can adjust the temperature as needed to melt the chocolate but you want to do it slowly so it does not harden. Continuous stirring is key and be prepared for some sticky fingers while stirring the pot. Once the chips are melted you will see a nice shine to the chocolate and it's time to pour! 
Be careful when lifting the bowl from the steamer basket if you are using this method since the bowl may be hot and water can collect on the bottom of the bowl and spill onto the baking sheet. Using a sturdy spatula pour the melted chocolate onto the parchment paper.
Using a spatula spread the chocolate to an even thickness. A helper is a big bonus for this step as trying to hold the parchment down and spread the chocolate could challenge an octopus.

Now the FUN part!! Decorating! There did need to be a few mild suggestions to NOT shovel all the candy into the mouth but to instead put it in the chocolate. This was a lot of fun to do and you can let the imagination go wild.
Once you have finished decorating your masterpiece place the cookie sheet into the fridge and allow to set until hardened, about half an hour. Once the bark has set use a heavy knife and a bit of elbow grease to cut the bark into pieces.
 When we cook we share. Bulk Barn had these amazing containers we are using to give some gifts in. Wonder who will find one in their mailbox??

 
The finished product. After I assured the Divas that we were keeping SOME of the bark ourselves, the rest has made its way into gift boxes to share with neighbours and friends. We have a lot of people to thank that have helped us over the year while I have been recovering from two knee surgeries! Hopefully this sweet thank you will be a hit!
This bark is also a good way to use up candy that is received for Halloween. Last year we melted our Jersey Milk and Aero bars and made chocolate dipped strawberries for a party.
I hope you all have a safe and fun Halloween and if you find some time on a rainy Sunday get out the chocolate and get in the kitchen and make some of this Bootiful Bark!

Happy Halloween!


Monday, October 26, 2015

Cloudy with a chance of Moroccan Meatballs

The leaves are falling, the air is getting crisper and the hours of sunlight diminishing. I personally love autumn and look forward to cosy nights together with the family. It also gives me more time in the kitchen to bring out the soup pot and find new dishes to make together with the Divas.

The Divas are not big sandwich eaters so trying to come up with creative and healthy lunches that will go in the thermos on cold days is a challenge. I am not a fan of canned soups because of all the sodium and ingredients. I also enjoy involving the girls in meal selection and working together in the kitchen to create nutritious meals. Italian Wedding Soup is a favourite of both girls so we went on a hunt to find a similar recipe that was healthy and easy to make. I found a great recipe for Moroccan Meatball Soup with Couscous from site called littlespicejar.com. The spices in this recipe are amazing and we created a soup that smelled delicious and was a BIG hit for flavours.
Ingredients:
 
Meatballs:
1 teaspoon ground coriander
1 teaspoon ground cumin
½ teaspoon curry powder
½ teaspoon dried thyme
¼ teaspoon turmeric
⅛ teaspoon ground cinnamon
⅛ teaspoon nutmeg
¼ teaspoon chili powder
salt and pepper to taste
2 tablespoons tomato paste
1.5 lb. ground lamb or beef
We shied away from eating ground beef and instead we use ground turkey in all of our recipes calling for beef. We are lucky to have deal that comes up often on Wag Jag where we can purchase 12 pounds of ground turkey in individual packages for $29.00 from a local meat store. They are shown above and easy to store in the freezer and very lean meat.
As part of my fall/spring cleaning I like to refill all my jars with fresh spices. The Bulk Barn is a great way to buy them and easy to purchase small amounts. I treated myself to a new spice rack from Kitchen Stuff Plus since our old one was very large and took up too much room on our prep counter. 
My favourite thing about this blog is that it became a way to share our tried, tested and approved recipes and get the Divas into the kitchen with me for some quality time and help with making meals. The girls have a love of cooking and we have fun putting on some music and creating great meals together.  Making these meatballs was messy but worth it. It was also a great way to teach about proper food handling. I spent January of 2000 in a hospital in Mexico with a case of salmonella and typhoid. What a way to celebrate the Millennium! Since then I have taken beginner chef courses and worked in many restaurants so I am a bit compulsive about safe found handling. 
To make your meatballs begin by preheating the oven to 375ºF and place your rack in the centre of the oven. Line your baking sheets with parchment paper. In a medium bowl, combine the spices, salt and pepper. Mix with the spoon. Add the tomato paste and ground meat and mix using your hands. I sprayed olive oil on our hands before and it helped with the rolling process. Scoop about 1 teaspoon of the meatball mixture and form a ball, place on the prepared baking sheet. Bake the meatballs for about 10-12 minutes or until baked through. The aroma of these cooking is heavenly!

The youngest Diva did a great job and we rolled two cookie sheets full to pop in the oven. I would make these meatballs and also use them in a light sauce and serve with rice pilaf for another meal.
 
Ingredients:
 
Soup:
8 oz Israeli (pearl) couscous
3 tablespoons olive oil + 2 teaspoons
3 shallots, minced
8 cloves garlic, minced
4 cups chicken or vegetable broth
3¾ cups water
Chopped mint or parsley, for serving
One of my MUST HAVE kitchen gadgets is a weigh scale. This is one I got from Starfrit and is a lifesaver when recipes call for ounces, grams or pounds.

While meatballs are baking, heat 2 teaspoons of olive oil in a small saucepan over medium heat. When heated, add the couscous and allow the couscous to toast for just 1-2 minutes. You'll know it's done when you can smell the toasty aroma.  If you have never cooked with couscous before it is very easy to prepare and a nice change from rice and potatoes. This form of couscous is called Israeli and is available at the Bulk Barn.


Add a pinch of salt and 1¾ cups water, allow to come to a boil, reduce the heat to low, cover, and allow to cook for 8-10 or until water is absorbed
In a large pot or dutch oven, heat the 3 tablespoons of oil oil over medium-high heat. Add the shallots and garlic and allow to sauté for about 1 minute.
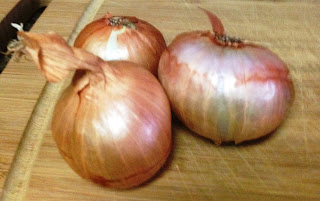
Before you ask what the heck is a shallot here is a description from the Good Housekeeping site:
Shallots, like onions and garlic, are a member of the allium family, but their flavor is richer, sweeter, yet more potent. Like garlic, they grow in clusters, with several bulbs attached at the base. You'll recognize them by their coppery skins and their off-white flesh, which is usually tinged with magenta. Shallots add a great depth of flavor to pan sautés, soups, sauces, and stews, and pair especially well with chicken and fish. To substitute one for the other in recipes, use half the amount of shallot that you would onion.

 Add in the chicken broth along with the remaining 2 cups of water and bring to a boil. Reduce the heat to low and add in the meatballs along with couscous and continue to simmer for 10 minutes. We like to add chopped spinach to ours to get in some extra iron and calcium. For those of you with picky diners you can omit this ingredient.  Remove the pot from heat, garnish with a handful of chopped mint or flat-leaf parsley, if desired.

We have been very fortunate to have a Cobs Bakery open up around the corner and their rolls and baguettes are incredible and baked fresh all day. The Divas ride to the store together to pick up dinner rolls and somehow apple caramel scones always seem to come home with them as well :)
This soup does freeze well and was a big hit for lunches with the girls. We hope you enjoy it as much as we did!
 
Bon Appetit!


Friday, October 23, 2015

TGIFajitas!!!

 
It's Friday! You made it!  Don't spend the night in the kitchen, just "set it and forget it." 
 
The week has been long enough. Work, homework, housework, yard work, groceries laundry, conference calls, deadlines and sometimes near a cardiac flat line. This is YOUR night to relax with our without the kids.
This will be a short blog because this recipe requires very little work and minimal preparation. This is a very easy recipe that will allow you more time to spend together and make for a fun serve yourself dinner! You can do all the prep ahead and have the kids help you with the toppings and every one can wrap and roll their own supper!


Ingredients:
 
1 lb boneless, skinless chicken breast (usually 3-4 breasts)
1 red pepper
1 yellow pepper
1 orange or green pepper
1 package of Fajita seasoning (I prefer to buy the lower sodium variety)
1 large Vidalia onion
 

Step one is to get in your cosies, grab a glass of wine or a cup of tea and relax while your Crockpot does the work. This recipe takes four hours so if you are not the owner of a Crockpot with an automatic timer setting you may want to get in touch with Santa and place your order soon. One of the inconveniences of Crockpot cooking is that many recipes require 6 or more hours but then need to be shut off. For those individuals that are commuting or do not have a butler to turn off the Crockpot, this can lead to some very well done food! 


Make dinner fun for you and the family. Picking a theme gets the children excited and involved and can be a great way to use disposables instead of having a big dishwasher load to empty the next morning!
We MAY happen to like football. We MAY happen to love the Green Bay Packers. We MAY have a LOT of paraphernalia in our home! I love paper plate dinners. We try to buy items that can go in the compost bin so our clean up is quick and easy and we have more time for popcorn and movies.  Find a fun theme like a favourite movie, sports team, country and make the kids help you "decorate" for the dinner.


As mentioned above, this is a very quick recipe to assemble. I like to julienne my peppers so the bites are more appealing to the Divas and the flavour of the peppers is not overwhelming. We are fans of Green Bay Packers but NOT of green peppers so we like to use the red, orange and yellow variety. Strap on some sunglasses or goggles and slice that onion with a box of tissues nearby.  I have found that putting the onion in the freezer for about 15 minutes before cutting reduces the tear flow. Prepping the onions and pepper the night or a few days before and placing them in the fridge makes for an effortless assembly.                        


In the Crockpot place the onions and peppers on the bottom of the dish. Add the chicken breasts and with oiled hands mix the package of fajita seasoning with the peppers and chicken and combine until well coated. Once the ingredients are blended place the chicken breasts on the top of the pepper onion mixture.
Place the crock pot on high for 4 hours.
 
 
Once the cooking time is complete remove the chicken breasts and shred with two forks. During the cooking process you can prepare you favorite toppings and have your tortillas warming. Favourites of ours for toppings include salsa, sour cream, shredded cheese and lettuce and salsa.
The Divas love to assemble their own and it makes for a fun family time at the dinner table. We still have to help with the roll and fold and we use large tortillas to avoid excess mess. It is a fun finger food meal and you will want to be sure to have extra napkins on hand.
 
 
Keep this recipe in mind for busy days with like Halloween, double the recipe for company, or prepare ahead and take to the cottage or chalet so you can unpack and relax with the family on arrival day.


Fridays in our house are about family, fires, fun, films, flannels and fajitas.

Thursday, October 15, 2015

Curry in a Hurry!


 Tropical Chicken Curry with Pineapple and  Mini Bananas

This is a quick and easy way to introduce your family to an ethnic and healthy meal.


  The leaves are changing colours and falling, the air is getting crisp and the hours of daylight are diminishing. We happen to be a family that loves fall and all the beautiful things that come with it. Brisk walks in nature, visual delights everywhere you look, a return to a normal schedule, warm sweaters and favourite boots. There is also something special about family time when fall approaches. Celebrating Thanksgiving, decorating for Halloween and a favourite of the Divas is Family Movie Night which MUST include a roaring fire and the most comfortable pyjamas.  We may also really enjoy Sundays when perhaps the Green Bay Packers are playing and we may just have a little team spirit (we brainwashed the Divas from birth.)


  Once our extracurricular activities are done for the week, I enjoy using my time to do some prep and cooking for the week ahead as well as trying out new recipes on a day when the chaos level is not so high.  We are very fortunate to have two girls that are very good eaters and willing to always "try two bites."  We started them as infants on whole grains, limited dairy and always tried to introduce them to new foods. The one speed bump we hit was anything that had "spice."  For the Divas "spice" was anything that had a fresh flavour or herb. I can name off fresh basil, oregano, cilantro, thyme, seasoning, cumin and anything on my spice rack. I did not want to be limited to being a short order cook and we certainly did not want to survive on chicken fingers, plain potatoes or salad and vegetable without seasoning.

 How do you introduce children to food with new flavours? Let them help you plan the menu, go shopping together, use lesser amounts of spices than the recipe calls for, and make it a fun theme night. We decided to try curry since the Divas love to use Naan bread for making their own garlic bread, pizzas or dipping into soups and stews. I also have a British husband who is very fond of spice on rice! This is a recipe using bananas and pineapple so it has a sweetness that works well with the curry and produces and very mild flavor. 


Ingredients:

1 lb boneless skinless chicken breasts, chopped to bite size pieces
12 teaspoon salt
12 teaspoon pepper
1 onion, chopped
1 small sweet red pepper, chopped
2 garlic cloves, minced
1 tablespoon mild curry paste or powder
1 12 cups chicken stock
1 bay leaf
3 bananas, mini firm and ripe (use 2 small bananas if you can't find the mini)
1 cup fresh pineapple, chopped, you can use canned
1 tablespoon cornstarch
1 tablespoon water
 Fresh coriander leaves, chopped (optional)


One MUST HAVE in my kitchen is a spoon rest. When you are dealing with raw poultry it is essential you have somewhere to put your spatula or ladle down without contaminating any other surfaces. Once the meat is cooked be sure to use another clean utensil and not cross contaminate. Food poisoning is NOT fun. Take it from someone who got Salmonella and Typhoid inMexico!


In a large non-stick skillet, heat oil over medium-high heat.
Add chicken and sprinkle with salt and pepper, cook, stirring for 5 minutes.
Remove to a plate.


While the chicken is cooking or you are prepping your fruit and vegetables, it is a good time to get your rice started on the stove. We are big fans of basmati or jasmine rice that work well with Thai, Chinese or Indian cuisine.  You can purchase the rice at the Bulk Barn to save money but just remember to grab the ingredient cards that are with the products or you may end up with a cupboard full of "I have no idea what is it or how to cook it" items.


I have learned that my children's taste can change daily, hourly, by the minute. When pineapple and watermelon were a hit we went and purchased a whole one of each. They sat uneaten in the fridge while we were questioned as to why we had no bananas or grapes in the house. Despite my preference for fresh food I have no qualms about buying canned fruit in its own juices to avoid filling my compost bin weekly with the Divas' changing food preferences. The Pineapple Tidbits by Dole are a great purchase and if you double the rice you prepare you can make a great last minute fried rice to fill the lunch thermos on a chilly day!


Add onions, red pepper, and garlic to the pan, cook stirring for about 3 minutes or until softened.


What are the mini bananas we speak of? They are offered in the produce section at our local grocery stores and the big hit with the Divas for this recipe was picking them out and cutting them up. If you cannot find these you can substitute one medium to large banana.


Add curry paste and cook stirring for one minute.


Add chicken stock and bay leaf and bring to a boil. Peel and chop bananas into 1 inch chunks and add to the skillet along with the reserved chicken. Simmer about 5 minutes, or until the chicken in no longer pink inside. Add pineapple and stir to combine.


In a small bowl, whisk together corn starch and water until combined. Add the mixture to the pan for a few minutes or until thickened slightly.


The Duncan style of serving this curry is with a side of rice or on a bed of rice with grilled Naan bread. The curry can be topped with a dollop of sour cream or plain Greek yogurt and is phenomenal with fresh cilantro.


Introduce new flavours to your children slowly but it certainly makes the culinary world more exciting for Mom and Dad when you can all eat the same amazing food!
Bon Appétit!!